
In order to create a print ready file you must follow the following rules and recommendations:
- We recommend using professional graphic design software that are usually used for printed product artwork creations such as: Adobe Illustrator, Corel Draw and Adobe Photoshop.
- Before start please make sure you have selected correct page size (in this case if you want final size of the business card to be 85×55 mm then you should make page size 89×59 mm size) with 2mm bleed all around that will be trimmed off after print. Cards are printed on A3 sheets and cut afterwards to final size, therefore all designs must have bleed area.
- In Photoshop program please don’t forget to select 300 DPI resolution and choose CMYK color mode (Image>Color mode>CMYK). Photoshop new page creation sample image can be found on the right side of this page.
- We recommend to start the design from background image or color. Image and/or color should cover areas until edge of the page. If desired background is white then please skip this step.
- IMPORTANT please remember that 2 mm all around will be trimmed off after cutting, which means there can not be any important text or logo too near the edge of the page. We recommend to leave at least 4mm gap to the edge of the file with bleed so that after cutting there would be 2mm left to the edge. Only background images must reach edge of the page
- When finishin up the design it’s important to save it as high quality PDF print file. PDF files we can inspect easily and fast so it is the best file format for artworks that are print ready.
- If you need any additional information please contact us and we’ll be happy to help.


Instructions how to save print ready PDF files in different programs:
Corel instructions for print ready PDF export:
- Press “File > Publish to PDF…”
- In opened new window find a place for your new file and choose following settings as in the picture below: “PDF preset > PREPRESS”

- For additional setting please click on “Settings…”
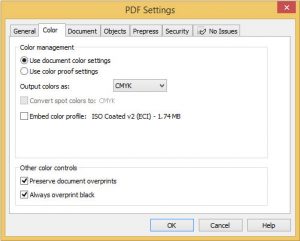
- In additional setting window chose Color tab and make it same as in this sample image
- After that go to Prepress tab and unmark “Bleed limit…” as in sample

- Then save current settings by pressing “Ok” button and when window closes you can finish up saving PDF by pressing “Save” button
If all settings were made as shown you should have a print ready file
To save photoshop file as PDF just click on File>Save as option
Then select Photoshop PDF (*.pdf) format from the list of available formats
Click save
You should get a print ready file if initial settings when starting design creation was correct as in the explanation above